
Thank you for signing the Data Processing Agreement in your account.
save your document
We have emailed a copy of your signed agreement to the user email address you are signed into FG Funnels® with.
If you don't see it in your inbox within 15 minutes, check if it got lost in a promotional/spam folder.
It will arrive from [email protected].
A few more steps to full compliance
Now, you need to set up at least a few more things to ensure you are compliant** :
- A custom checkbox on your opt-in form that will allow new contacts to confirm their consent to receive information from you/your business
- Set up a workflow that tags the contact based on their response to the checkbox you create in the opt-in form to confirm consent
- Set up a smart filtered clean list which you can use each time you send to ensure you only send to contacts who have given their consent to receive information from you/your business
- Add a cookie consent/privacy policy pop-up or banner to your website/funnels.
**We are not lawyers, and this is not legal advice. Please consult with a trusted legal expert for guidelines to ensure compliance for your business specific to where and how it operates.
explicit opt-in with a custom checkbox
When having contacts opt in through your forms and surveys, you can use a checkbox to ask for their explicit consent to be sent marketing emails.
This can be set up in your FG Funnels® account using a custom checkbox and a workflow.
Then you can use the tag you set up for this checkbox to add a filter to your smart list clean filters and ensure you are only sending marketing emails to people who have given their consent.
Part One: Creating A Checkbox Custom Field
Step 1:
You can create the checkbox custom field by going to Settings > Custom Fields and then later add the field into forms from the Form Builder menu.
Or, if you're in the Form Builder, go to Custom Fields on the top right of the builder menu and scroll to the bottom of the custom fields listed there to the orange box and click the button to add a new custom field.
Step 2:
A menu will appear, select “Checkbox”
Give the field a name - this will appear on the form above the checkbox. In our video above, we show how to use the placeholder field to store an external name so you can use an internal field name, if you prefer.
The placeholder in the checkbox field will not show on the form.
This is your GDPR Compliance Statement.
Example: "Check this box to confirm you agree to receive marketing emails - you can unsubscribe at any time." **
**Disclaimer: This is **NOT AN OFFICIAL GDPR COMPLIANCE STATEMENT**
Then add "Yes" as answer that can be selected. You can also add "no", though some prefer to leave this option off.
Step 3:
When adding this field to your forms, you'll want to be sure to mark the checkbox as a required field in order to submit the form. To do this, hover over the checkbox field on the form itself.
Once selected, on the right-hand side a "Required" box will be listed in the field's settings. Select this box so a checkmark appears in it.
Part Two: Building A Workflow To Tag Compliant Contacts
Step 1:
Navigate to Automations > Workflows and create a new workflow, choosing the option to start from scratch.
Step 2:
Select the title at the top and name the workflow as desired.
Step 3:
Click on “Add New Workflow Trigger”.
A menu will appear, the third column will say “Choose a Workflow Trigger”, select that and scroll down till you see “Form Submitted”.
Select the custom field and apply the Yes condition.
Step 4:
Click on the + sign below the trigger area to open up the actions menu. Then scroll down to the Conditions and Workflow section and select “If / Else”.
Inside Segments on the left in “Select” click on Contact Details and scroll down to Custom fields where you will see your GDPR checkbox custom field.
Next over in Select Operator, click on includes and another field will open and select yes.
Hit Save on the bottom right.
Step 5:
Under the Yes path click on the + sign to open up the actions.
Under the “CRM” section select Add Contact Tag.
Once you click on “Select a Tag” your tags will pop up, and if you do not already have the tag made, you can enter in the name of the tag that you want it to be - ex. "compliant" , "opted in - marketing emails", etc - and create it right then and there.
Hit Save on the bottom right.
Step 6:
For the no path, you will follow the same steps, the only difference will be that the tag name will be signify that they did not consent to marketing emails - ex. "non-compliant", "not opted in - marketing emails", etc.
Part Three: Setting Up Smart Lists To Filter For The Compliance Tag
Step 1:
Hop over to Contacts / Smartlists. In the top-right corner above the list, you will see a button labeled More Filters, click on that button.
Step 2:
Once selected, an “Add Filter” type box will appear, type in 'tag' to bring up the tag filter, then select "is" from the middle dropdown, and in the select tag dropdown choose your "compliant" tag.
If you are an FGF Mail subscriber, be sure to use this tag in combination with the clean list filters we teach in our Best Practices.
If you already have a smart list that you want to add the filter to, you can select that Smart List to open it and then select the "More Filters" button in the top-right corner above the list to view the filters and add this new additional filter to the list.
Step 3:
Save your new smart list, or smart list changes.
privacy policy and cookie pop-up
These are instructions for adding a super simple policy notice pop-up to your funnel and/or website pages.
It's important to note, this is a very simplistic pop-up.
For an advanced solution that will allow your website visitors to choose the cookies that are tracked, and keep track of the visitor and their selection across all pages of your website, we highly recommend the third party service Cookie Bot. It is super simple to set up and free for a single domain with less than 100 subpages.
If you'd like to add a simple "Accept Cookies and Privacy Policy" pop up to your page, you can follow the steps below. Keep in mind you'll need to do this on each page you want the banner to appear on, and the banner will not be able to keep track of visitors or their responses.
Step 1:
Click into the page builder on the Funnel/Website page you'd like to add the pop up to.
Step 2:
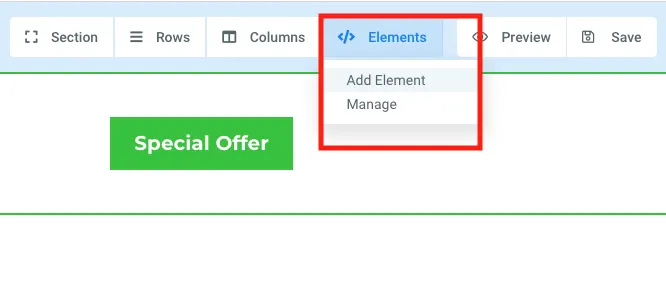
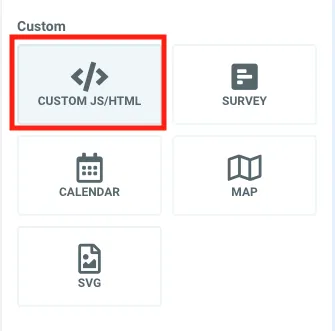
Select "Add Element" > Scroll down to Custom and select "Custom JS/HTML" > Drag and drop element to the TOP of the Funnel/Website page
Step 3:
Navigate to the Settings menu on the left side of the window > Select "Open Code Editor" > Copy and paste in the following code:
<script>
window.hlptcb = {};/*
* Editable Options
*/
window.hlptcb.popup_title = 'Accept Cookies & Privacy Policy?'; //Title/Heading Optional
window.hlptcb.popup_message = 'This website uses cookies to improve your user experience. By accepting and closing the cookie information banner when first visiting the page you consent to our use of cookies when scrolling the front page, clicking on a link or continuing to navigate in other ways.... ';
window.hlptcb.popup_more_title = 'More information';
window.hlptcb.popup_more_link_url = '#';
window.hlptcb.popup_accept_button_title = 'Accept Cookies';
window.hlptcb.popup_style_width = '50%';
window.hlptcb.popup_style_mobile_width = '100%';
window.hlptcb.popup_style_z_index = '100';
window.hlptcb.popup_style_bgcolor = '#FFFFFF';
window.hlptcb.popup_style_title_color = '#688A7C';
window.hlptcb.popup_style_more_link_color = '#AD816D';
window.hlptcb.popup_style_button_color = '#FFFFFF';
window.hlptcb.popup_style_button_bgcolor = '#688A7C';
/////Editable options end here. Please don't change the code below.
function hlpt_cb_docReady(fn) { if (document.readyState === "complete" || document.readyState === "interactive") { setTimeout(fn, 1); } else { document.addEventListener("DOMContentLoaded", fn); } }
hlpt_cb_docReady(function() {     console.log('Screen Width: ' + screen.availWidth);    hlpt_display_cookie_banner();
});
window.hlptcb.popup_title = window.hlptcb.popup_title || '';
window.hlptcb.popup_message = window.hlptcb.popup_message || '';
window.hlptcb.popup_more_title = window.hlptcb.popup_more_title || '';
window.hlptcb.popup_more_link_url = window.hlptcb.popup_more_link_url || '';
window.hlptcb.popup_accept_button_title = window.hlptcb.popup_accept_button_title || 'Accept Cookies';
window.hlptcb.popup_style_width = window.hlptcb.popup_style_width || '50%';
window.hlptcb.popup_style_mobile_width = window.hlptcb.popup_style_mobile_width || '100%';
window.hlptcb.popup_style_z_index = window.hlptcb.popup_style_z_index || '100';
window.hlptcb.popup_style_bgcolor = window.hlptcb.popup_style_bgcolor || '#FFFFFF';
window.hlptcb.popup_style_title_color = window.hlptcb.popup_style_title_color || '#000000';
window.hlptcb.popup_style_more_link_color = window.hlptcb.popup_style_more_link_color || '#F04C5B';
window.hlptcb.popup_style_button_color = window.hlptcb.popup_style_button_color || '#FFFFFF';
window.hlptcb.popup_style_button_bgcolor = window.hlptcb.popup_style_button_bgcolor || '#000000';
window.hlptcb.popup_html = '';
if(window.hlptcb.popup_message)    {        window.hlptcb.popup_html += '<div class="hlpt_cb_wrapper">';        if(window.hlptcb.popup_title)   window.hlptcb.popup_html += '<p class="hlpt_cb_title"><strong>'+window.hlptcb.popup_title+'</strong></p>';        window.hlptcb.popup_html += '<p>'+window.hlptcb.popup_message;        if( window.hlptcb.popup_more_title && window.hlptcb.popup_more_link_url )   window.hlptcb.popup_html += ' <a href="'+window.hlptcb.popup_more_link_url+'">'+window.hlptcb.popup_more_title+'</a>';        window.hlptcb.popup_html += '<div class="hlpt_cb_btn_wrapper"><button id="hlpt_cb_bclose" class="close" type="button" style="border:0px; padding:10px 15px;border-radius: 0;">'+window.hlptcb.popup_accept_button_title+'</button></div>';        window.hlptcb.popup_html += '</p>';        window.hlptcb.popup_html += '</div>'    }
function hlpt_display_cookie_banner() {    const hlpt_cb_div = document.createElement("div");    hlpt_cb_div.innerHTML = window.hlptcb.popup_html;    hlpt_cb_div.setAttribute("id", "hlpt_cb");    hlpt_cb_div.setAttribute("class", "cookie-banner");    hlpt_cb_div.style.setProperty("display", "none");
    if(screen.availWidth < 500)   hlpt_cb_div.classList.add("cookie-banner-mobile");
    document.body.append(hlpt_cb_div);    hlpt_cb_update_styles();
    console.log('Is cookie shown? - ' + localStorage.getItem("hlpt_cb_closed"));
    if (localStorage.getItem("hlpt_cb_closed") != "accepted") {        document.getElementById('hlpt_cb').classList.add("cookie-banner-opened");        hlpt_cb_div.style.setProperty("display", "block");                    };    var close_buttons = document.getElementsByClassName("close");    for (var i = 0; i < close_buttons.length; i++) {        close_buttons[i].addEventListener('click', hlpt_cb_close_banner, false);    }
}
function hlpt_cb_close_banner() {    document.getElementById('hlpt_cb').classList.add("cookie-banner-closed");    document.getElementById('hlpt_cb').style.setProperty("display", "none");    localStorage.setItem("hlpt_cb_closed","accepted");
};
function hlpt_cb_update_styles() {    document.querySelector(".cookie-banner").style.setProperty( "width", window.hlptcb.popup_style_width );    if(document.querySelector(".cookie-banner-mobile") !== null)   document.querySelector(".cookie-banner-mobile").style.setProperty( "width", window.hlptcb.popup_style_mobile_width );    document.querySelector(".cookie-banner").style.setProperty( "position", "fixed" );    document.querySelector(".cookie-banner").style.setProperty( "z-index", window.hlptcb.popup_style_z_index );    document.querySelector(".cookie-banner").style.setProperty( "bottom", "30px" );    document.querySelector(".cookie-banner").style.setProperty( "max-width", "315px" );    document.querySelector(".cookie-banner").style.setProperty( "margin-left", "30px" );    document.querySelector(".cookie-banner").style.setProperty( "right", "30px" );    document.querySelector(".cookie-banner").style.setProperty( "padding", "20px" );    document.querySelector(".cookie-banner").style.setProperty( "display", "none" );    document.querySelector(".cookie-banner").style.setProperty( "align-items", "center" );    document.querySelector(".cookie-banner").style.setProperty( "justify-content", "space-between" );    document.querySelector(".cookie-banner").style.setProperty( "background-color", window.hlptcb.popup_style_bgcolor );    document.querySelector(".cookie-banner").style.setProperty( "color", "#241f0a" );    document.querySelector(".cookie-banner").style.setProperty( "border-radius", "0" );    document.querySelector(".cookie-banner").style.setProperty( "box-shadow", "0 6px 6px rgba(0,0,0,0.25)" );    document.querySelector(".cookie-banner").style.setProperty( "font-family", "var(--contentfont)" );    document.querySelector(".hlpt_cb_btn_wrapper").style.setProperty( "margin-top", "20px" );    document.querySelector(".hlpt_cb_wrapper").style.setProperty( "position", "relative" );    if(document.querySelector(".hlpt_cb_wrapper .hlpt_cb_title") !== null)   document.querySelector(".hlpt_cb_wrapper .hlpt_cb_title").style.setProperty( "color", window.hlptcb.popup_style_title_color );    if(document.querySelector(".hlpt_cb_wrapper .hlpt_cb_title") !== null)   document.querySelector(".hlpt_cb_wrapper .hlpt_cb_title").style.setProperty( "margin-bottom", "15px" );    if(document.querySelector(".hlpt_cb_wrapper a") !== null)   document.querySelector(".hlpt_cb_wrapper a").style.setProperty( "color", window.hlptcb.popup_style_more_link_color );    document.querySelector("#hlpt_cb_bclose").style.setProperty( "background-color", window.hlptcb.popup_style_button_bgcolor );    document.querySelector("#hlpt_cb_bclose").style.setProperty( "color", window.hlptcb.popup_style_button_color );    document.querySelector("#hlpt_cb_bclose").style.setProperty( "cursor", "pointer" );
}
</script>
Step 4:
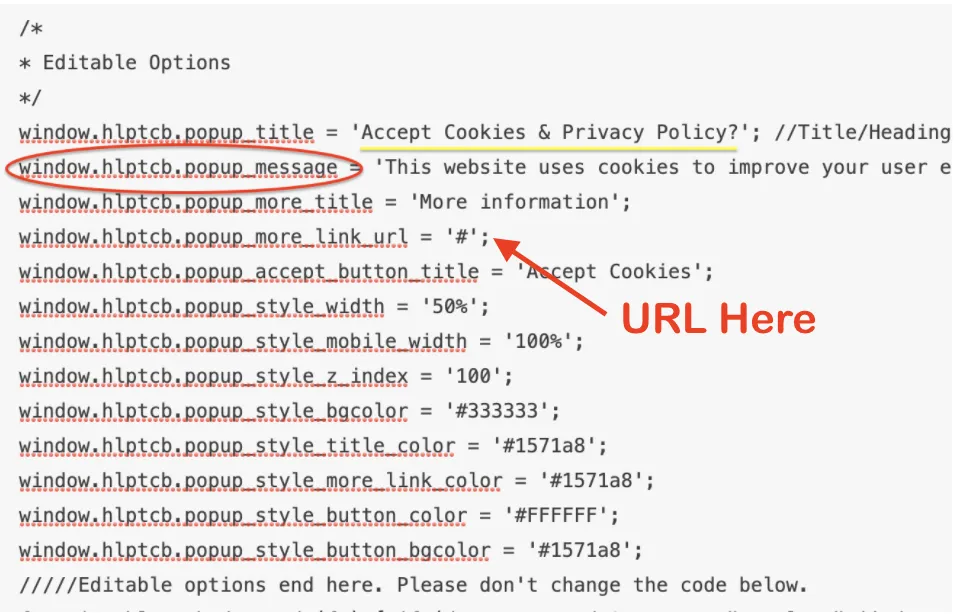
Edit the "Editable Options" section within the code as you wish. You can edit the popup title (or remove it if you prefer by deleting the entire line that starts with window.hlptcb.popup_title), the message body, the "More Information" and "Accept" button titles, colors, and more.
Only edit information within the ' ' as shown below for the title (yellow underlined example).
The 2nd Editable Option is circled in red below – this line is where you can edit the message that is displayed. You can also add the URL where the # is in the 4th editable option.
Step 5:
Click "Save"
NOTE: This article is intended as a "how-to" showing you the steps to create a popup. Check with your compliance team, HR, or other legal expert regarding specific verbiage and technical requirements for compliance in your region.
© Copyright 2020 - 2025
Funnel Gorgeous, LLC.
For Support Issues or Questions, Please Email Us at [email protected]